Friday, November 15, 2013

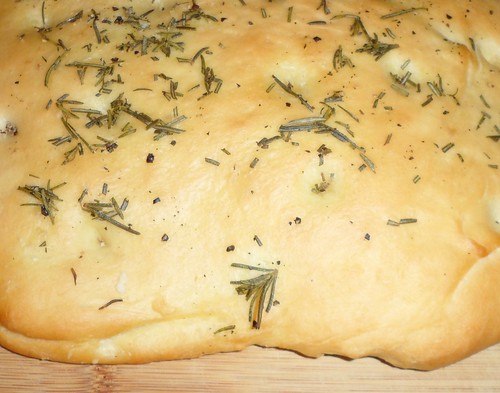
Rosemary Focaccia

Rosemay Focaccia

I try to avoid using the oven during the summer. Now that the weather has turned cool, it is a perfect time to bake focaccia.

Before my kids went away to college, we would enjoy this as an appetizer on home trivia evenings. We used the Brain Quest trivia decks when my son and daughter were young. The kids always liked it when they could answer a question based on something they learned in school. It was even better if they knew something their parents did not.

My kids liked to take focaccia sandwiches to school for lunch. I enjoy the bread reheated until crunchy and served with soup on cold day.

This recipe is based on the "Rosemary Focaccia" recipe in Betty Crocker's Bread Machine Cookbook (copyright 1995) that my sister gave me. I doubled the recipe quantities and modified the recipe to use a free-standing KithenAid mixer instead of a bread machine.

Rosemary

Since we have a hugh rosemary bush growing in the front of our house, I use fresh rosemary. Rosemary is easy to grow; just remember that rosemary likes dry soil. Our family still talks about the rosemary and lavender hedges we saw in Australia.

If you use dried rosemary, soak the rosemary in olive oil before spreading on top.

Variations

This recipe is easy to modify. I have used jalapeño slices, olives, Parmesan cheese, and cooked potato slices as toppings. I have also added crushed red pepper flakes and Indian 5 Spice mixture (i.e., equal parts of cumin seeds, black mustard seeds, fennel seeds, fenugreek seeds, and kalonji seeds) to the dough.

Yeast

I use bulk yeast, currently Fleischmann's Instant Dry Yeast, that I buy at Sam's.

Baking sheets

My baking sheets are seasoned and I do not grease them. If needed, grease baking sheets before placing loaves on them.

Olive oil

I find the easiest way to spread the olive oil on top of dough is with my fingers. You can use a pastry brush or slowly pour the oil from the bottle instead.

Ingredients
1 1/2CupsWarm water
1TbspYeast
pinchSugar, for yeast liquid
4CupsBread flour
2TbspSugar, for dough
1TbspSalt
4TbspOlive oil for dough
4TbspOlive oil for topping
4TbspRosemary, fresh preferred, chopped
Fresh ground black pepper, to taste
Kosher flake salt, optional
Directions
  1. In small pitcher or pyrex measuring cup, mix lukewarm water, yeast, and pinch sugar. Let sit 5-10 minutes until yeast starts working, liquid gets frothy as bubbles begin to form.
  2. While waiting, put bread flour, sugar, salt, and olive oil in KitchenAid mixing bowl.
  3. Using flat beater at low speed, mix yeast liquid into flour mixture until just moist. Cover with a towel, and wait 5 minutes.
  4. Switch to dough hook, and mix for about 5 minutes until dough is smooth and elastic and forms a ball. If dough is too sticky, add 1-2 tablespoon flour at a time, and continue mixing and adding flour until dough is correct consistency.
  5. Place dough in oiled bowl, and turn dough to coat with oil. Cover bowl with a towel, and let rise until double, about 1 hour.
  6. Divide dough into 2 pieces. Using a rolling pin, roll each piece into a rectangle, approximately 10" X 12". If needed, grease baking sheets. Place each dough rectangle on a baking sheet. Cover with towels, and let rise about 30 minutes.
  7. Preheat oven to 400 degrees.
  8. Using your finger, make indentations in dough about every 2". Top each loaf with olive oil, rosemary, and freshly ground black pepper. If desired, sprinkle kosher flake salt on top.
  9. Bake 15-18 minutes until golden brown.
Friday, October 18, 2013

Ridge Gourd Experiments/Standard Indian Vegetable Recipe

I volunteer at Pinckneyville Middle School's garden. When my husband visited India earlier this year, I asked him to bring home Indian vegetable seeds. I thought the students would enjoy learning about different vegetables.

We planted the vegetables in our home garden at the beginning of the summer. When school started in the fall, there were ridge gourd vines circling the fence around our garden.

I brought the first ripe ridge gourd to a garden club meeting to show the students. The kids and master gardeners, Mim Harris and Kelli Clay, advising the club wondered what the gourd tasted like. We tried it and thought it tasted like a cross between a zucchini and a cucumber with a slightly bitter skin.

At another meeting, we enjoyed peeled, raw slices and ridge gourd chutney. We talked about ideas for preparing the gourd. Anyone who wanted took a gourd home after agreeing to report how they ate it. Some ate it raw, some sauteed it with olive oil and garlic, and some used it in soup.

Cutting the Ridge Gourd

To prepare ridge gourd, I cut off the ridges using a paring knife. I peel young, tender gourds using a swivel vegetable peeler. I use a fixed blade peeler for older gourds with tougher skin.

My Experiments

Since this was a new vegetable for me, the first dish I made was Indian ridge gourd using my standard Indian vegetable recipe that I have included below. I also added chopped up pieces of gourd to my Indian lentils (umptee).

The ridge gourd dish my husband remembered eating while he was growing up in India was chutney made with ridge gourd peel and sesame seeds. From the blog Priya's Versatile Recipes, I made Ridgegourd Peels N Sesame Seeds Chutney. When we visited my son at UGA, I brought him some of this chutney and other homemade goodies. Recently when he was home visiting, he told me he particularly liked this dish. Next time I make this dish, I plan to remove the outer strings of the gourd which resemble celery strings.

Another dish my husband and I enjoyed was Ridge Gourd Chutney from the blog Rak's Kitchen. The middle school students tried this as a dip with pieces of pitas.

My daughter who attends Georgia State University liked the pasta dishes I made with ridge gourd, olive oil, garlic and a combination of the following: tomatoes, peppers, and/or cream. I also tried using the gourd in soups and as an omelet filling. The slightly bitter flavor of the gourd did now work well in the omelet.

I am currently drying some gourds for loofah. I plan to save the seeds, so students can grow them in the school garden next year.

Standard Indian Vegetable Recipe

I learned this recipe from my husband and in-laws. I use it to cook a variety of vegetables: potatoes, cauliflower, spinach, peas. I also use it for mix of vegetables (e.g., spinach and potatoes, potatoes and peas).

Ingredients
3-4 Ridge gourds, peeled and chopped into 1/2-3/4 inch pieces, about 4 cups
1 MediumOnion, chopped, about 1 cup
1-2 Jalapeño pepper, finely minced, to taste
2 TbspVegetable oil
1/4 TspMustard seeds, black preferred
PinchAsafoetida
1/8 TspTurmeric
1 CupTomatoes, chopped
1/8 TspCayenne pepper
1/4 TspBlack (Goda) masala
1/2 TspSalt
2 TbspCilantro leaves, chopped
Directions
  1. In a large pot, heat oil and mustard seeds on medium high heat. When mustard seeds pop, add onions. Cook until onions are translucent, about 3-5 minutes. Turn heat down if onions start to brown.
  2. Add turmeric and asafoetida and cook for 30 seconds.
  3. Add ridge gourd and jalapeño peppers. Stir to mix. Cover, turn heat to low, and cook 5 minutes.
  4. Add salt, cayenne, and black masala. Stir to mix. Cover and cook 5 more minutes.
  5. Using a fork, check to see if vegetables are ready. Vegetables are ready when they can be easily pricked with a fork but are still firm. If vegetables are not ready or for softer vegetables, cover and continue cooking for 5 more minutes.
  6. Continue checking and cooking until vegetables are done.
  7. Turn off heat, and top with cilantro before serving.
  8. This same recipe can be used for other vegetables including potatoes and cauliflower. Add 2 tablespoons of water for vegetables with low moisture content. If needed, add more water while cooking.

Sunday, July 28, 2013

Umptee/Umpti/Amti/Normal Dal/Maharashtrian Dal (Lentils)

I learned to cook this recipe from my Indian in-laws when they visited the United States. It is the type of dal, my husband's paternal grandparents ate for lunch and dinner most days. My husband ate it often when he was growing up.

Recipe Name

Since I learned to cook dal from my in-laws, I did not have a written recipe. I always assumed the dish name was umptee. When writing the recipe, my husband told me the name is amti. My daughter usually calls this normal dal to distinguish it from other Indian lentil dishes I serve. If she wrote the name, she would spell it umpti.

Toor Dal

Toor dal, also called pigeon peas, is a yellow lentil that is common in India. It is usually sold split without the outer hull. I buy mine at the Indian grocery. It comes in two varieties, plain and oily. I buy the plain. Unseasoned, cooked dal is easy to digest and makes a good baby food. When my kids were little, I put some of the dal aside for them when making this dish.

Black (Goda) Masala

Black (Goda) masala is a Maharashtrian spice mixture made of roasted and ground coconut, chilis, and other spices. Like many Indian families, I get mine from relatives (e.g., my mother-in-law and sister-in-law) in Indian. It is one of the things we always get when we visit India or ask for when relatives visit. Sometimes, Goda masala is available at Indian grocery stores.

Ingredients
3/4 CupToor dal, plain preferred
5 CupsWater, total
1 LargeOnion, cut in half and then crescents, about 2 cups
1 Jalapeno pepper, finely minced
2 TbspVegetable oil
1/2 TspMustard seeds, black preferred
1/8 TspAsafoetida
1/4 TspTurmeric
1 CupTomatoes, chopped
1/4 TspCayenne pepper
1/2 TspBlack (Goda) masala
1 1/2 TspSalt
1/4 CupDried coconut, unsweetened
2 TbspCilantro leaves, chopped
Fresh lemon juice, optional
Directions
  1. Rinse dal, add 3 cups of water and cook until soft. In a pressure cooker, cook for 5 minutes after reaching pressure.
  2. In a large pot, heat oil and mustard seeds on medium high heat. When mustard seeds pop, add onions. Cook until onions are translucent, about 3-5 minutes. Turn heat down if onions start to brown.
  3. Add turmeric and asafoetida and cook for 30 seconds.
  4. Add toor dal, 2 cups of water, tomatoes, jalapeno, cayenne pepper, black masala, salt, and coconut. Increase heat and bring to a boil. Reduce heat and simmer 10 minutes. Adjust seasonings to taste.
  5. Turn off heat, and add cilantro before serving. If desired, add fresh lemon juice to the entire pot or on top of individual servings.

Friday, June 21, 2013

Father's Day Monkey Bread and Uppama/Savory Cream of Wheat

This past Sunday was my husband's birthday as well as Father's Day. To celebrate my son and I made him a special brunch. My son baked monkey bread, and I cooked uppama, savory Indian cream of wheat.

Monkey Bread

My son likes to make monkey bread from scratch for special occasions (e.g., Mother's Day, Father's Day, Christmas). He uses the recipe in the article "Let's Make Monkey Bread" from the December/January 2005 edition of Family Fun magazine. You can find it here Let's Make Monkey Bread. Since it is time consuming to make, he either mixes the dough or prepares the bread in the bundt pan and lets it rise in the refrigerator overnight. In the morning, he continues preparing the bread and/or baking it.

Uppama/Savory Cream of Wheat

I do not like the texture of cooked oatmeal or cream of wheat, however, this savory dish is a family favorite. The recipe is based on "Zakiya's Uppama" from Madhur Jaffrey's World of the East Vegetarian Cooking. The original recipe calls for cabbage, potatoes, and onions. So we will have leftovers, I add more vegetables and double the cream of wheat. I use vegetables that are ripe in our garden or that I have on hand. The following version calls for yellow squash since squash is ripe now. Later in the summer, I make it with okra, and I use carrots other times of the year.

Indian Ingredients

Black mustard seeds, asafoetida, channa dal, urad dal, and curry leaves are available at an Indian grocery. If you do not have black mustard seeds, substitute yellow mustard seeds. You can omit the asafoetida and curry leaves. Instead of channa and urad dal, you can use cashews.

Texture

The final texture of the dish is dependent upon the water in the vegetables you cook and how much water you add. Some people like their uppama dry while others prefer it wetter. Vary the water to your taste.

Ingredients
2 TbspVegetable oil
1/2 TspBlack mustard seeds
pinch Asafoetida
1 Dried Cayenne pepper
1 TbspChanna dal
2 TbspUrad dal
1 Onion, chopped, about 1 1/2 cups
1/4 LbPotato, about 1 medium sized potato, peeled and diced
1/2 LbYellow crookneck squash, chopped
1 CupFrozen peas
1 TbspFresh ginger, grated
1 Jalapeno pepper, finely chopped
6 Curry leaves
2 TspSalt
2 CupsCream of wheat
2 CupsHow water, approximate
2 TbspCilantro, finely chopped
Directions
  1. Heat oil on high in a large pot. Add mustard seeds. When seeds pop, add dried cayenne pepper, channa dal, and urad dal. Cook until dals begin to brown, stirring often.
  2. Reduce heat to medium high, add onions, and cook for 1-2 minutes.
  3. Add potatoes and cook for 1-2 minutes. Stir to prevent potatoes sticking.
  4. Add squash, frozen peas, ginger, curry leaves. Stir to mix. Cook 1-2 minutes.
  5. Reduce heat to medium-low. Cover and cook until vegetables are cooked, about 10 minutes. Stir and check every 5 minutes.
  6. When veggies are cooked, add salt. Turn heat to medium high. Add cream of wheat, and stir to mix. Cook until cream of wheat is lightly roasted about 5 minutes. Do not brown cream of wheat.
  7. Reduce heat to medium low, add hot water about a 1/4 cup at a time. Stir and cook until water is absorbed before adding more water.
  8. Turn off heat, cover, and let sit 5 minutes. Sprinkle chopped cilantro on top and fluff with a fork before serving.

Wednesday, June 5, 2013

Madhur Jaffrey's Indian Cooking

My son is home from college for the summer. Because he likes to play games, I challenged him to write a review of a game. In return, I agreed to write a cookbook review. I think I have the easier job since I have been cooking from Madhur Jaffrey's Indian Cooking book for almost 25 years.

My first Indian cookbooks were gifts mailed to me from my Indian in-laws. Madhur Jaffrey's book was the first Indian cookbook I used that was intended for Americans. It was easier to use than my Indian ones since I did not have to worry about Indian cup sizes, unusual spice and vegetable names (e.g., haldi for turmeric, lady's finger for okra), or temperatures in marks.

The introductory material in Indian Cooking including ingredient descriptions and techniques is informative. I like the color pictures of selected dishes and the author's recipe introductions. The English recipe titles with Indian equivalent names below make the book accessible for those unfamiliar with the Indian dishes. The term pulses for beans and peas was new to me when I first read the book.

The detailed ingredient list and precise directions guide beginning Indian cooks to successful results. I had problems with the direction "fry until all the water evaporates and you see the oil again", probably because I use less than the recommended amount of oil I.

The serving suggestions encouraged me to try adding an Indian dish to meals. After I had experience, the Indian meal guidelines were are helpful.

Many of our family favorites come from this book. Every year after Easter, I make "Hard-boiled Eggs in a Spicy Cream Sauce" or "Vinegared Eggs" with our dyed Easter eggs. "Chicken with Cream" is our standard main dish when we invite friends over for an Indian dinner. For Thanksgiving, I cook "Sweet Yellow Rice" as a side dish. Even friends, who were hesitant to try Indian food, have enjoyed "Gujerati-style Cabbage with Carrots" when I brought it to potlucks. My husband and kids enjoy "Vermicelli Pudding" for dessert after an Indian meal, however I make it with vermicelli from an Indian grocery store.

I recommend this book for friends interested in Indian cooking, and I have given it as gifts. The book's size, approximately 200 pages, is not overwhelming for anyone who wants to try Indian cooking. It contains a variety of meat, vegetables, rice, bread, dessert, and condiment recipes. Some of the dishes are similar to ones served in Indian restaurants (e.g., "Tandoori-style" Chicken" and "Sour Chickpeas") and others more like the home cooking my husband grew up eating (e.g., "Rice with Yellow Split Peas" and "Sweet and Sour Okra") .

Check out my son's review of the the video game Tiny and Big or Cutting Down EVERYTHING

Monday, June 3, 2013

Congratulations Graduates!

Congratulations to all the Spring 2013 graduates especially my son, my daughter, their friends, and our relatives!

My family had an exciting spring. My son graduated from the Terry College of Business at the University of Georgia with a Bachelor of Business Administration degree in accounting. Two weeks later, my daughter graduated from Norcross High School, completing the International Baccalaureate program.

In the fall, my son will continue at UGA working on his Master of Accountancy (MAcc). My daughter will start Georgia State University studying nursing and pre-med.

A Graduation Note for My Kids

You should be proud of your accomplishments. I am inspired by your achievements. Instead of a traditional graduation gift, I wanted to spend time creating a special gift for you. Since family meals and eating well are important to our family, I created a recipe blog for you.

I am looking forward to adding recipes made with fresh vegetables from our garden this summer and holiday favorites in the fall. Let me know what favorites you would like me to include.

Love,

Mom

Tuesday, May 28, 2013

Yeast Sweet Potato Bread Mini Loaves

I first made a full sized sweet potato bread loaf with home grown sweet potatoes when my mom visited last November for my daughter's band senior night. The bread had a beautiful orange color and tasted great toasted with soup. In December, I donated some mini loaves to my daughter's winter guard bake sale. My daughter's math teacher bought a loaf and asked for the recipe.

I used the "Spiced Pumpkin Bread" recipe in The Bread Box Recipe Book that came with my old Toastmaster bread machine as a rough guide the first two times I made this bread. I mixed the dough with my KitchenAid mixer and added flour, oil, yeast, and water as necessary to get the correct dough consistency. When I tried to write the recipe, I had trouble duplicating my original results.

After many loaves, I finally have a successful recipe to make mini loaves. My daughter gave her teachers loaves made with the following recipe as end of the year teacher gifts.

I think some of my problems writing the recipe were due to difference in sweet potatoes. Although my subsequent loaves had a nice golden color, none of them were the brilliant orange of the original loaves made with fresh sweet potatoes. Since sweet potatoes differ, if your dough is too sticky, slowly add more flour. If your dough is not elastic, gradually add more oil. If you want your bread to rise more, add more yeast the next time you make it or try letting it rise longer.

Yeast

I like to buy yeast in bulk; the individual packages sold in most grocery stores are not cost effective. I am currently using Fleischmann's Instant Dry Yeast that I bought at Sam's where two 1-lb vacuum packed packages are sold together. I store in the unopened yeast in my cabinet. Once open, I store the yeast in a bottle in the refrigerator. To ensure the yeast is good, my first step in making bread is mixing the yeast with warm water and a little sugar and letting it sit until the yeast starts working (e.g., liquid gets frothy as bubbles begin to form).

Sweet Potatoes

To prepare the sweet potatoes for the bread, I cut them in half and pressure cook them for 10 minutes after the pressure cooker is at pressure.

Mini Pan Size

My mini pans measure 3 1/8" X 5 5/8" at the top, 2 1/4" X 4 3/4" at the bottom, and 2" deep.

Ingredients
1/4 CupWarm water
1 1/2 TbspYeast
pinchSugar
1 CupSweet potato, mashed (about 1 large potato)
1/4 CupVegetable oil
1/4 CupBrown sugar, packed
2 TspSalt
1 TspLemon juice
1 Egg
4 CupsBread Flour
Vegetable shortening for greasing loaf pans
Directions
  1. In a small bowl or pyrex measuring cup, mix lukewarm water, yeast, and pinch of sugar. Let sit 5-10 minutes until yeast starts working, liquid gets frothy as bubbles begin to form.
  2. While waiting, mix sweet potato, vegetable oil, brown sugar, salt, lemon juice and egg in a large mixer using the flat beater.
  3. Add bread flour to liquid mixture, one cup at a time, mixing lightly after each cup. If flour flies in air, turn mixer quickly on and off until flour begins to be incorporated. Repeat until all 4 cups are added.
  4. Add yeast mixture to flour and stir until moist. Remove flat beater and replace with dough hook. Cover mixer with a kitchen towel, and let dough sit for 5 minutes.
  5. Mix using dough hook until dough is smooth and elastic. If dough is too sticky, add small amount of flour and mix. Repeat if needed.
  6. Put dough in oiled bowl and allow to rise until double about 1 1/2 - 2 hours.
  7. Remove from dough from bowl, and knead lightly by hand. Divide into four equal parts. Using a rolling pin, roll each part into a rectangle 4 1/2" X 12". Starting at one short end, roll up into a loaf. Put in a greased mini-loaf pan.
  8. Allow dough to rise in pans until loaf shaped, about 1 1/2 - 2 hours.
  9. Preheat oven to 375°. Bake 15 minutes until loaves are light brown. Cover loaf pans with aluminum foil and bake 10-15 minutes more, until bread sounds hollow when tapped.
  10. Allow to cool 5 minutes before removing from pans.

Thursday, May 23, 2013

Blueberry Muffins with Lime Glaze

This recipe shows how you can modify a recipe you like. It is almost identical to the cranberry orange recipe. In the summer, my kids are responsible for picking the blueberries from our bushes. We freeze the berries to use throughout the year. Our berries are slightly tart. I think the berries taste sweeter if you thaw the blueberries before adding them to the batter.

I like the flavor the lime zest and glaze add to the muffins. A thick glaze spread on warm, not hot muffins, works best. Otherwise, your glaze drips off the muffins. The recipe makes about 18 regular size muffins.

Ingredients

1 1/4 Cups White flour
1 Cup Wheat flour
1 Tsp Baking soda
2 Tsp Baking powder
Pinch Salt
1 1/3 Cups Brown sugar, packed
2 Tbsp Lime rind, grated (from about 3 medium-sized limes)
1 Cup Buttermilk
1 Egg, beaten
2/3 Cup Canola oil
2 Cups Blueberries, thawed if frozed or fresh
1 Cup Powdered sugar
1 1/2 - 2 Tbsp Lime juice
Directions
  1. Preheat oven to 400°. Grease and flour muffin tins or place muffin liners in tin.
  2. In a large bowl, sift together white flour, wheat flour, baking soda, baking powder, and salt. Stir to mix well.
  3. Add brown sugar and lime rind. Stir to mix well.
  4. In a small bowl, wisk together buttermilk, egg, and oil.
  5. Add liquid ingredients to dry ingredients and stir until mixed.
  6. Stir in blueberries.
  7. Using a measuring cup, fill muffin tins 2/3 full.
  8. For regular muffins, bake 15 minutes. If not done, reduce heat to 350° and bake for 5 more minutes.
  9. Let cool 5 minutes before removing from tins.
  10. For glaze, mix powdered sugar and lime juice until smooth but thick. Spoon over warm muffins.

Monday, May 20, 2013

Katrina MRE Cranberry Orange Muffins

Since my brother-in-law is an electrician, excellent sheetrock installer, and all around handyman, he was one of the first people to return to the New Orleans area and begin cleanup after Katrina. Because of the limited resources at that time, MREs were given out to help feed everyone. Since my son was a Boy Scout, his uncle gave him his leftover MREs to use on camping trips. Since I do not like to see food go to waste, I claimed the dried cranberries from the MREs and used them to make cranberry orange muffins. We liked the muffins, and I now make them with Ocean Spray Craisins. My daughter took them with her last week on her Physics class's camping trip.

I used the streusel muffin recipe from the article "How to Make Professional Muffins at Home" in the magazine Cook's Illustrated September/October 1993 as a basis for this recipe. I omitted the topping and modified the recipe to use whole wheat flour and dried fruit. It makes about 16-18 regular size muffins, 1 dozen mini-muffins and 12 regular size muffins, or 2 dozen mini-muffins and 6-8 regular size muffins.

Muffin Liners?

I like to use muffin liners when baking muffins. They shorten the time needed to clean the muffin pans. I think it is easier to pack a muffin with a liner in a lunch box and neater to eat it.

Muffins are relatively inexpensive to make, but liners can vary significantly in price. I try and get them for less than 2 cents each. I once bought a large box at a warehouse store, but I have not found them again. Check different locations in grocery stores for choices. Our local Ingles sells them near the cake mixes and by the plastic wrap. You can sometimes buy them on sale after holidays. I am currently using Halloween liners that I stocked up on when they were 90% off at Target. Instead of 2 cents per liner, three Halloween liners cost less than a penny.

If you decide not to use liners, grease and flour your muffin tins well. Grease and flour both the muffin compartments and the tray top.

Fill Only 2/3 Full

A common mistake is to completely fill your muffins. Since the batter expands as it cooks, you only need to fill the muffin compartments 2/3 full.

Ingredients
1 1/4CupsWhite flour
1CupWheat flour
1TspBaking soda
2TspsBaking powder
PinchSalt
1 1/3 CupsBrown sugar, packed
2TbspsOrange rind, grated (from about 2 medium-sized oranges)
1CupButtermilk
1Egg, beaten
2/3CupCanola oil
1CupCraisins or other dried cranberries
Directions
  1. Preheat oven to 400°. Grease and flour muffin tins or place muffin liners in tin.
  2. In a large bowl, sift together white flour, wheat flour, baking soda, baking powder, and salt. Stir to mix well.
  3. Add brown sugar and orange rind. Stir to mix well.
  4. In a small bowl, wisk together buttermilk, egg, and oil.
  5. Add liquid ingredients to dry ingredients and stir until mixed.
  6. Stir in Craisins.
  7. Using a measuring cup for regular muffins and tablespoon for mini-muffins, fill muffin tins 2/3 full.
  8. For mini-muffins, bake 10 minutes. If not done, reduce heat to 350° and bake for 5 more minutes.
  9. For regular muffins, bake 15 minutes. If not done, reduce heat to 350° and bake for 5 more minutes.
  10. Let cool 5 minutes before removing from tins.

Friday, April 19, 2013

Garden Quiche

I usually make quiche as a Sunday brunch dish. Quiche also works as a light supper or a vegetarian potluck contribution. Cooking quiche is a good way to use leftover vegetables (e.g., steamed broccoli or sautéed onions and peppers) and dairy products before they spoil.

I learned to make quiche using the "Quiche Formula" in Mollie Katzen's The Enchanted Broccoli Forest cookbook. Since our family did not finish the crust, I omit it. Because I use 2% milk, I add flour to my egg mixture to make the quiche firm. If you use higher fat milk products, you can omit the flour. I make my quiche in a 1 1/2 quart oval CorningWare casserole dish. I like to use a hand egg beater for mixing the eggs and milk.

The other day, I made this quiche for a quick supper before my daughter left on a band trip. I used some of the last broccoli for this year from our garden as well as spinach and swiss chard we are growing. If you prefer use just one of these vegetable. I like to add onions and garlic. For variety, substitute cheddar or swiss for the havarti in this recipe.

Ingredients
2TbspsOlive oil
6ClovesGarlic, peeled and finely chopped
1/2Large onion, finely sliced
1/2LbsBroccoli, crowns cut in small florets and stems peeled and cut into 1/2 inch pieces
1/8LbsSwiss chard, leaves separate from stems which are cut in 1/2 inch pieces
1/8LbsSpinach
1TspCavender's Greek seasoning
Vegetable shortening
3-4OzHavarti Cheese, finely sliced
6Eggs, large
2CupsMilk, 2%
2TbspsWhite flour
1 1/2 TspsTony Chachere's Creole seasoning
Paprika
Directions
  1. Preheat oven to 375 degrees.
  2. In olive oil, sauté garlic, onions, broccoli stems, and swiss chard stems on medium high heat until edges start to brown, about 5 minutes.
  3. Turn heat down to medium. Add broccoli crowns and cook for 2 minutes.
  4. Cover and cook for 5 minutes.
  5. Add spinach and swiss chard leaves, cover and cook for 5 minutes until vegetables are tender.
  6. Add Greek seasoning, allow to cool, and finely chop the vegetables.
  7. Using shortening, lightly grease a 1 1/2 quart oval CorningWare casserole dish.
  8. Place finely sliced havarti cheese in bottom of casserole dish.
  9. Put chopped vegetables on top of cheese.
  10. Beat together eggs, milk, flour, and creole seasoning. Pour into casserole dish.
  11. Sprinkle with paprika and bake for 35 minutes until eggs and milk are set.
  12. Let cool 5 minutes before serving.

Thursday, March 21, 2013

Chinese Eggplant with Tofu

Eggplant with Spicy Garlic Sauce from the restaurant Little Szechuan on Buford Highway was the first eggplant dish my daughter liked. I modified the "Shredded Eggplant with Minced Pork" recipe from the California Culinary Academy's cookbookChinese Cooking Techniques to create this vegetarian dish my daughter enjoys eating at home.

Eggplant

I have made this recipe with both the large regular or Italian eggplants and thin Chinese or Japanese eggplants. For both types, I recommend removing the eggplant skin, unless it is very tender, to get the best results.

The following recipe specifies thin Chinese or Japanese eggplants. I use about 2 2" X 12" eggplants to make this dish. If using large regular or Italian eggplants, bake the eggplants longer until they are tender.

Soy Sauce

I use regular or dark soy sauce when cooking this dish; however, my family prefers Pearl River Bridge light soy sauce for table use. We first tried this soy sauce when my daughter prepared some Chinese recipes that used this brand for a school project.

Ingredients

1 1/2 - 2 Lbs Chinese or Japanese (long, thin) eggplants
1 Tsp Sugar
2 Tbsp Soy sauce
1 Tbsp Rice vinegar
1/2 Tsp Salt
2 Tbsp Vegetable oil
1 Medium Onion, cut in 1/2 and then into cresent slices
2 Tbsp Ginger, peeled and finely grated
2 Tbsp Garlic, finely chopped
1/2 - 1 Tsp Red pepper flakes
1/2 Lbs Tofu, cut into 2" X 1/4" X 1/4" pieces
1 Tsp Sesame seed oil
Directions
  1. Preheat oven to 350°. Prick eggplant, place on rimmed baking sheet and bake until tender, about 1 hour. Every 15 minutes, turn the eggplant so all sides cook.
  2. Peel eggplant and cut into strips 1/4" x 2".
  3. Mix together sugar, soy sauce, rice vinegar, and salt in a tea cup to make a sauce.
  4. Over high heat, heat oil in wok. When hot, add onion slices and cook 2-3 minutes, stirring often until edges start to turn brown.
  5. Add ginger and garlic and cook for 30 seconds.
  6. Add red pepper flakes and cook for 10 seconds.
  7. Add tofu and cook for 30 seconds.
  8. Reduce heat to medium. Add eggplant strips and sauce from tea cup. Cook 3-5 minutes until throughly heated, stirring often.
  9. Turn off heat and drizzle with sesame seed oil.
  10. Serve with rice and extra soy sauce.

Monday, March 18, 2013

Make Your Own Yogurt

While visiting India, I enjoyed homemade yogurt in different dishes. Some of my favorites were vegetables, yogurt, and spices mixed in a raita, curd rice served to aid digestion after a spicy meal, and shrikhand, saffron flavored sweetened strained yogurt, similar to Greek yogurt.

I started making my own yogurt after receiving an EasiYo yogurt maker from my aunt as a Christmas present.

EasiYo

The EasiYo yogurt maker is a thermal carafe with a container for yogurt that fits inside it. The space around the container is filled with boiling water to help the yogurt set. The yogurt maker came with powdered, instant yogurt mix. I enjoyed the initial packages. Since refills were not easily available, I adopted the following yogurt making technique using fresh milk, powdered milk, and a tablespoon of store bought yogurt with active cultures.

If you do not have an EasiYo, you can substitute an insulated water jug. As a test, I made two cups, a half batch of the following yogurt recipe, in my daughter's half-gallon Rubbermaid water cooler that she used for band practice. I put an empty, 8 ounce plastic yogurt cup in the bottom of the cooler topped with a one quart glass canning jar containing the heated milk and yogurt. I added boiling water, closed the container, and let it set.

Yogurt Culture

To start my yogurt the first time, I use a tablespoon of store bought yogurt with active cultures. Then the next time, I use a tablespoon of my old yogurt in the new batch. I also keep a tablespoon frozen. If I use all my yogurt or have a yogurt flop, I can thaw this tablespoon and use it for a new batch.

Dry Milk

Especially when using low-fat milk, the yogurt I made was thin; so I started adding dry milk to get a thicker result. I use instant nonfat dry milk from Aldi or Wal-Mart.

Sweet Yogurt

I usually make plain yogurt. For sweet yogurt, add sugar to room temperature milk before putting it to set. Try a half-cup sugar to 4 cups milk for a slightly sweet yogurt.

Boiling Milk

Be careful when you boil the milk to make the yogurt. When it gets hots, the milk rises very quickly. If you are not careful, the hot milk can easily spill over unto the stove and is a mess to clean up. After cleaning a sticky, milky stove a couple of times, I learned it is easier to watch the pot when heating milk than cleanup after it boils over.

I use a heavy 2 quart stainless steel pot that I have reserved for milk and sweets to heat milk for yogurt. Although I thought I cleaned my pots well, I had problems with funny tastes in my yogurt before I reserved a pot for this use.

The worst part of making yogurt is cleaning the dirty pot. I soak the pot and scrub it with steel wool and AJAX to get it clean.

Yogurt Flops

Occasionally yogurt fails to set because either the milk was not heated well enough or was too hot when the yogurt was added. If this happens, you can use the milk in pancakes or quiche.

Ingredients

4 Cups Milk, 2% or whole
1/2 Cup Dried Milk
1 Tbsp Yogurt with active cultures
1/2 Cup Sugar, optional
Directions
  1. Using a hand held blender, blend dry milk and 1 cup milk together.
  2. In a heavy pan on high heat, heat all the milk until it boils. Watch carefully to prevent it boiling over. You should see tiny bubbles forming around the edge of the pan. After this happens, the milk will rise quickly. Immediately, turn heat to low. If needed, lift pan from burner to prevent milk from boiling over.
  3. Heat milk on low for 1 minute.
  4. Allow milk to cool to room temperature. In container or jar, mix yogurt and milk. If desired, add sugar. Put container or jar in EasiYo or insulated container and surround with boiling water. Let sit for 8 hours. Store set yogurt in refrigerator.

Tuesday, March 5, 2013

Indian Cabbage with Coconut

I made this dish last night. It takes less than 10 minutes to cook once you have the vegetables chopped. Your dad says that green beans are often cooked in a similar way.

Coconut

When I was growing up, the only type of coconut I knew was Baker's sweetened shredded coconut that was used on cakes and in baked sweets. Since I did not like the sweetness and texture of this product, I thought I did not like coconut.

Since meeting your dad, I have enjoyed eating fresh and dried coconut in Indian dishes. One of the kitchen tools your grandparents brought us when they visited from India was a coconut grater.

I use dry, desiccated, powdered coconut in this recipe. You can buy this coconut at the local Ingles near the chocolate chips and other baking supplies; however, you get about twice the amount for the same cost at an Indian grocery or HMart. 

Ingredients

4 Cups Cabbage, finely chopped
½ Onion, large, finely chopped
1Hot pepper, serrano or jalapeño, finely chopped
2 Tbsp Vegetable oil
¼CupCoconut, dry powdered
1TspSalt
1/8 - ¼TspCayenne pepper
1TbspCilantro leaves, chopped

Directions
  1. Heat oil on high. When hot, add onions. Cook until onion edges start to brown, about 3 minutes.
  2. Turn heat down slightly. Add cabbage, hot pepper, coconut, salt, and cayenne pepper. Stir to mix. Cook about 3 minutes, stirring occasionally, until cabbage is slightly soft.
  3. Serve topped with chopped cilantro leaves.
For beans, add water in step 2, cover your pot, and slightly steam the beans. 

Monday, March 4, 2013

Indian Tomato Chutney

This is one of our favorite condiments. We use it like ketchup and dip roasted potatoes in it. I also serve it on the side with rice and lentils (i.e., dal) for a little zing. Since my kids do not like mayonnaise, they use it on their cheddar cheese sandwiches and with cream cheese on a bagel. My kids do not share their dad’s appetite for peanut butter and tomato chutney sandwiches and were surprised when he packed them for their school lunch. This recipe is based the “Tomato Chutney” recipe in Vasantha Moorthy’s The Vegetarian Menu Cookbook, a cookbook your dad brought back from one of his trips to India.

One of the things I love about growing vegetables is the opportunity to try new recipes. To avoid wasting produce, I try different ways to preserve vegetables. I first made this recipe when we had a surplus of fresh garden tomatoes. It has since become a family standard, and we usually have a jar in the refrigerator. My son has a jar in his dorm fridge, too. During the summer, I make and freeze plenty of chutney. Although I have not tried yet, I think you could can this chutney. You can buy black mustard seeds at an Indian grocery store.

Since it highlights our Indian-American heritage, this is one of the recipes we contributed to your great aunt’s 70th birthday cookbook. We have also shared jars of this chutney with our family friends. It is a particular favorite of one of my daughter’s friends.

Ingredients


2 1/3
Pounds
Tomatoes, peeled
6

Green Chilies (Thai, Serrano or jalapeno), silt
2
Tsp
Cayenne pepper
½
Tsp
Turmeric
2/3
Cup
Vegetable oil
2/3
Cup
Vinegar
1 ½
Tbsp
Salt
1/3
Cup
Sugar
6
Cloves
Garlic
1”
Piece
Ginger
1
Tbsp
Cumin Seeds
½
Tbsp
Mustard Seeds, black preferred

Directions
  1. Using a knife, make an “X” on the bottom of each tomato. Heat water until boiling in a small pot. With a slotted spoon, put each tomato in boiling water for 10 seconds. When tomatoes are cool, peel, remove stem area, and cut small tomatoes into 8 pieces and large ones into 16 pieces. Set aside in a bowl.
  2. Using a hand-held bender grind garlic, ginger, cumin seeds, mustard seeds, and vinegar together.
  3. Heat the oil. Fry hot peppers for 1 minute. Then, slowly add ground spice mixture. Be careful since the paste splatters. Fry paste until oil surfaces.
  4. Add the tomatoes and any accumulated juices. Cook until tomatoes turn soft.
  5. Add the salt, sugar, cayenne pepper, and turmeric, and cook a few minutes.
  6. Simmer stirring constantly until thick gravy is formed. Taste and adjust spices if necessary. I usually get your dad to taste for me. Optional, remove pepper skins from chutney.
  7. Pour in a clean jar and store in the fridge or freezer.

Half Wheat Pancakes


To make our food healthier, I limit the amount of white flour I use. While I have not completely switched to whole grains, I have had success swapping part of the wheat flour for part of the white flour in many of our recipes. Our pancake recipe is based on the “Sour Milk Pancakes” recipe in Joy of Cooking Vol. 2 but uses ½ wheat and ½ white flour.

It is important to cook the pancakes at the correct temperature. It took me a long time to figure out that pancakes cook best at slightly over medium heat (between the 1st and 2nd of the 3 dots between medium and high) on our Maytag stove. Before this I cooked them at too high or too low temperatures, and the outside would burn before the inside was cooked.

Maytag Stove

When I was growing up Maytag was know for its dependable washers and dryers. You can check out the link http://www.characterweb.com/maytag.html to read about the Maytag company and see a vintage Maytag commercial.

However, I recommend you avoid purchasing a Maytag stove. I am dissatisfied with our Maytag gas stove, model MGR4452BDW, that we bought in 2005. The power boost burner on this gas stove works great! I had problems boiling water to cook pasta with our previous stove, and the Maytag does this well. However, the metal strip on the bottom of the oven door is rusting. It is unreasonable to use a material that rusts on a kitchen appliance that will need cleaning.

Buttermilk 

Using buttermilk produces fluffy pancakes. If you do not have buttermilk, you can mix 2 tablespoons plain yogurt in 1 cup milk or use soured milk, mix 1 tablespoon of white vinegar or lemon juice in 1 cup of room temperature milk and let it sit for 5 minutes. Making pancakes is a great way to use up milk that is starting to spoil.

Ingredients

1
Cup
White flour
1
Cup
Wheat flour
2
Tsp
Sugar
1
Tsp
Salt
1 ½
Tsp
Baking powder
1
Tsp
Baking soda
2

Eggs, beaten
2
Cup
Buttermilk
1
Tbsp
Vegetable oil

Directions
  1. Using a large metal mesh strainer, sift together white flour, wheat flour, sugar, salt, baking power, and baking soda.
  2. In a separate bowl, mix together eggs, buttermilk, and oil.
  3. Add liquid ingredients to dry ingredients. Mix well. I like to use a manual egg beater for mixing. I, also, use a rubber spatula to scrape the sides and bottom of the bowl.
  4. Heat a non-stick griddle until medium hot. Pour about ¼ cup of batter for each pancake onto griddle. I cook 3 pancakes at a time.
  5. Heat until bubbles appear and edges are firm. Then flip. You will need to practice to know when it is time to flip.
  6. Cook on second side until done. I like to make a slash in the middle of my first pancakes to make sure they are completely cooked inside.
  7. Pancakes are best served immediately after cooking. To serve later, layer pancakes between towels to keep them from getting soggy.

Tuesday, February 26, 2013

Spicy Chex Mix


My son likes to make spicy chex mix as Christmas gifts for family and friends. He first made it for an assignment for his middle school family & consumer science course. Since it is one of his favorites, my daughter has baked it to send to her brother in a college care package.

Food Timeline

When my son was in 5th grade, we checked the website http://www.foodtimeline.org/ to get a snack idea for the traditional 5th grade 50s party. We learned that the chex mix recipe originated in this period and sent in our version as a treat. We used the same site to find a recipe for my daughter’s Brownie Girl Scout decade meal potluck. Since Bisquick appeared in the 1930s, we made cheeseburger pie as our contribution. This helped my daughter earn her Brownie Girl Scouts through the Years Try-It. You can find the recipe at http://www.bettycrocker.com/recipes/impossibly-easy-cheeseburger-pie/8c78aa78-c368-40fa-8a88-1654640c7525. Of course, this was before my daughter became a vegetarian.

Our Version

Our recipe is based on one we found in a make your own Christmas gifts book. Be careful. Depending on your peppers, it can be pretty spicy. We usually make two batches at a time since it does not last long in our house.  Sometimes we substitute Wheat Chex and/or Crispix for the Corn and Rice Chex and Cheez-Its for the Goldfish crackers. For a special treat, we replace some or all of the peanuts with cashews. My son adds extra cayenne pepper for a fiery version. For a school fundraiser, our recipe was published in A Taste of Norcross High School: Healthy Lifestyle 2010 Edition.

Ingredients

3
Tbsp
Butter, melted
3
Tbsp
Margarine, melted
2
Tsp
Tony Chachere’s Creole seasoning
½
Tsp
Oregano, dried
1
Tsp
Cumin, powdered
½
Tsp
Salt
2
Cloves
Garlic
1/3
Cup
Pickled jalapeño pepper slices, drained
3
Cups
Corn Chex cereal
3
Cups
Rice Chex cereal
3
Cups
Goldfish snack crackers
2
Cups
Peanuts, salted dry roasted

Directions
  1. Preheat oven to 250°.
  2.  Place nuts, crackers, and cereal in a large roasting pan.
  3. Using a hand-head blender, blend jalapeño pepper slices, garlic, melted butter, melted margarine, and spices.
  4. Slowly, pour spice mixture over cereal mixture. Toss gently with rubber spatula until well coated.
  5.  Bake 1¼ hours, stirring every 15 minutes.
  6. Spread on towels to cool. Store in an airtight container.


Monday, February 25, 2013

Three Ways to Cook Rice

Rice

Since both your dad and I ate a lot of rice when we were growing up, rice is a staple in our kitchen. Your Indian grandparents served your dad rice and dal (e.g., lentils) many times a week. I loved red bean and rice Mondays even when the school cafeteria served it for lunch and Grandma cooked them for dinner. When I went to college at the University of Louisiana at Lafayette, rice and brown gravy were available in the school cafeteria every day at lunch and dinner. When your uncle went to the University of Colorado at Boulder, potatoes were more common and rice was served only a couple of times a semester.

We usually have both jasmine and basmati rice at home. We use jasmine as our every day rice and use basmati for biryani, jambalaya, and pilaf. Some of the brands of jasmine rice we use are Super Lucky Elephant, Golden Star, and Three Dragons. I buy jasmine rice at HMart, Sam’s or Costco in large bags of 15 or more pounds and pay less than $1 per pound. I store the extra in a large Tupperware container or empty plastic ice cream buckets. Royal Basmati is one brand of basmati rice we like. I buy basmati rice at either an Indian grocery, Sam’s or Costco.

The key to cooking rice is using the right proportion of water to rice. I find that 1 cup rice to 2 cups water works well for jasmine rice. For basmati, I use 1 cup rice to 2 1/2 cups water. Depending on the rice, you might need to vary these amounts, but I find these ratios work fairly consistently.

When I was growing up, your grandma boiled rice in salted water and drained it in a colander. I prefer to cook it either in a rice cooker, a pot, or pressure cooker. I usually cook 1 ½ - 2 cups of rice at a time for the four of us. This is usually more than enough for a meal, and the extra rice can be used for another dish

Rice Cooker

My first choice for cooking rice is using a rice cooker. I use a vintage Hitachi rice cooker I bought at a thrift store. It is so easy that my son has been making rice since he was eight. You put the rice and water in the cooker and switch it on. When it dings signifying the rice is ready, switch it off and wait at least 5 minutes before serving. Our rice cooker has a keep warm setting, but I prefer not to use it because I find it dries out the rice.

Pot with Lid

I use a 3 quart Revere Ware stainless steel pot with a lid to cook 1 ½ - 2 cups rice. Put the rice and water in pot, bring to a boil. When boiling, reduce to a simmer, cover, and cook 11 minutes. Turn off heat and wait 5 minutes before serving.

FYI, I just found out that you can order Revere Ware replacement parts at www.reverewareparts.com

Pressure Cooker

A pressure cooker is good for cooking rice if you want it to stay warm for a while before eating it. Put bottom steam tray in cooker, add water to cover steam tray, put pan with rice and water in cooker. If desired, you can add a second pan on top of the rice pan to heat beans or vegetables while your rice cooks. Put lid and weight on cooker. Heat on high until reaching pressure when cooker whistles and weight rocks. Reduce heat to medium high and cook for 5 minutes. Allow pressure cooker to cool before opening.

Wednesday, February 13, 2013

Chocolate Chip Cookie Cake

This is one of my family’s favorite birthday treats. My son loves this cake. I made it as his birthday treat for his class from kindergarten through high school. I usually send in 1½ cakes for his class of 24 students. This is enough for a nice serving for everybody and some extra for the teacher.  I also made it to celebrate my daughter’s first birthday and recently made it for her 18th.

I copied the original recipe for “Monster Cookies” from a magazine, possibly Southern Living, when I was in college. You can omit the nuts and increase the chocolate chips to 2 cups.  For variety, substitute white chocolate chips, butterscotch chips, or peanut butter chips, and use different nuts. White chocolate chips with pecans works well.

For a home party, you can serve the cake directly from the pizza pan, using a serrated bread knife to cut it. If you need remove the cake from the pizza pan, I recommend cutting a round piece of parchment paper the size of the pan. Put this parchment on top of the greased and floured pan bottom and grease and flour it also. When the cake is taken out of the oven, run a knife around the edge to loosen it. When cool, carefully invert cake onto flat surface (e.g., cookie sheet.). When sending the cake to school, I put the cake on a piece cardboard covered with aluminum foil. I then like to put this into a flat cardboard box from Sam’s or Costco. When the cake is finished, the cardboard can be thrown away. I send a large plastic serrated knife to cut the cake. 

Ingredients

½
cup
butter or margarine, softened
1
cup
brown sugar, packed
½
cup
sugar
2

eggs
2 ¼
cup
all purpose flour
1
tsp.
baking soda
½
tsp.
salt
1
tsp.
vanilla
1 ½
cup
semi sweet chocolate chips
¾
cup
nuts

Directions
  1. Preheat oven to 350 degrees. Generously grease and flour the bottom and sides of a 14-inch deep-dish pizza pan. If not planning to serve the cake from the pizza pan, cover bottom with parchment circle and grease and flour it also.
  2. Using an electric mixer, cream butter in an electric mixer.  Gradually add sugars, beating until light and fluffy. Add eggs and vanilla. Beat until blended.
  3. Combine flour, baking soda, and salt. Add to creamed mixture, mixing well.
  4. Stir in chocolate chips and nuts by hand.
  5. Spoon batter into pizza pan. The dough is sticky so flour the top and press with your hands until the pizza pan bottom is evenly covered.  Alternatively use a floured pastry roller (small hand held rolling pin) to spread the batter (i.e., this works really well). Bake 350 degrees for 20 to 25 minutes. Let cool in pan. Then loosen edges and carefully remove. Brush extra flour off cake using a pastry brush. Decorate with frosting